Pages

Showing posts with label card weaving. Show all posts

Friday, August 16, 2013

Tiny Kitty's shoes

These shoes had been at this stage for a long time. In fact, so long that I didn't manage to find any of the earlier photos, even though I must have taken some. It doesn't really matter, because the stages up to this point are described in earlier posts about other shoes. I used a pair of wedge soles made by casting plaster in latex moulds. I glued some silver-colored fabric on the sides of the soles, glued pieces of leather as outer soles, and made the insoles using cardstock and the same fabric I used for the sides.


Next I glued the insoles in place as the straps were so thick that they had to be glued to the sides, not under the insoles (that works in bigger shoes, but not in 1/6 scale). The straps are made of card-woven bands left over from some earlier project. I glued one side first and let it dry.


Then I glued the other side and the pieces behind the heel that will hold the ankle straps.


The way of closing the ankle straps is a bit different from the ones I've tried before. I attached a small bead and button on the vertical piece and used glue to secure the ends of the thread. The bead is there to make some room between the band and the button, so closing the strap will be easier.


Then I glued the ankle straps in place. Making working buckles in this size isn't easy, so I used thin rubber bands. They will deteriorate in time, so I'm not too happy about using them, but they work very well in the short run.


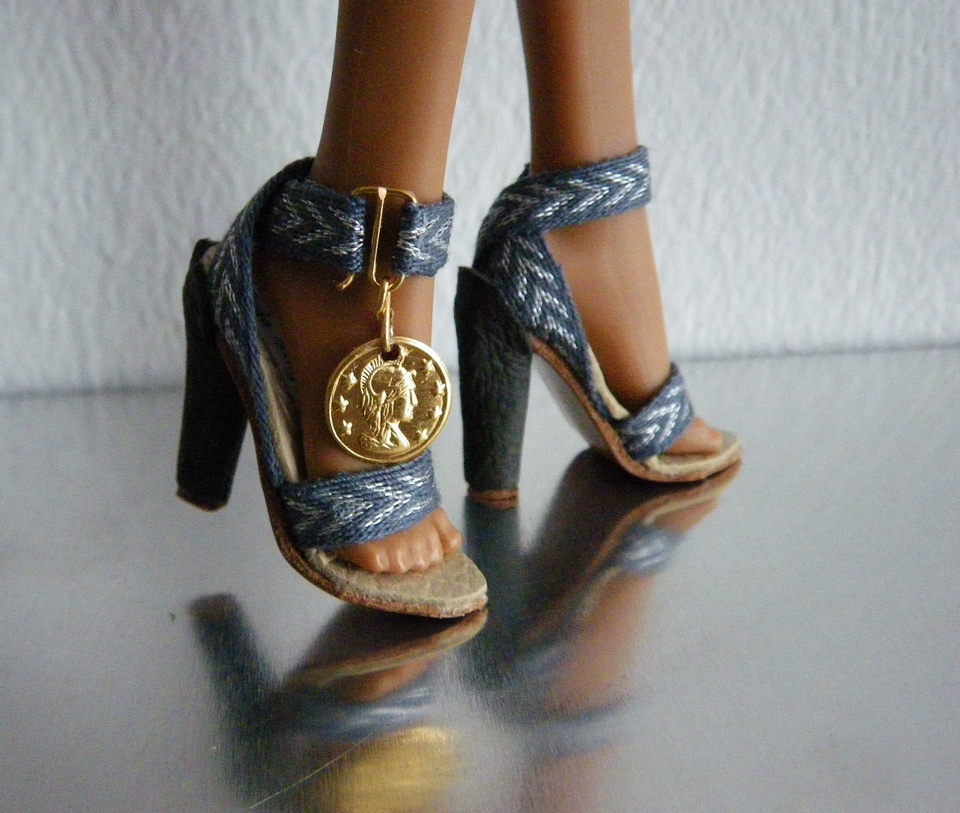
Here are the finished shoes from different angles. Dark ankle straps probably would look better, but I only had rubber bands in gold, silver, bronze and multi-color, so silver will have to do for now. Also the vertical pieces look clumsy. This is really why I rarely make shoes in this scale (only slightly bigger than Barbie shoes). It is so hard to make them look right.


Thursday, July 11, 2013

Miscellaneous stuff

I haven't done anything new for a while, but there are some things from last year that I haven't posted yet. First pair is Monster High wedges made of Cernit/Fimo and some lace. The method of making the soles is the one explained in this blog post. These are very simple shoes with just the wedge soles, insoles made of cardboard and leather, and some lace.


I made these shoes specifically for the Grayscale Frankie and you can see her wearing them in the story The Not So Grim Reaper.


The next two are variations of the Leopard print shoes for Monster High dolls.


The last Monster High pair is made of what was left of the card-woven band I used for Nefera's shoes.


Finally, there's the first pair I've ever made for a Novi Stars doll, in this case, Una Verse. I made these to go together with a dress I crocheted for the doll using the same sewing threads as in the card-woven bands. Otherwise, they're just leather, cardboard, and pieces of wood for heels.


Saturday, December 8, 2012

Cork soles for Nefera

I decided to finally use the card-woven band I made for Nefera's shoes, shown in this first photo:


For the soles, I wanted to use something that requires similar amount of effort, and also something that made it possible to glue the straps to the sides of the soles, so I made the soles out of cork. You can find details about how to do that in an earlier blog post.

I treated the band with sealer, so it could be cut at any place without the ends fraying. However, that made the band very stiff, so gluing the straps required applying more pressure than usual.


Here are the shoes with the strap that goes behind the ankle not yet glued to the sole.


 All straps glued in place and buttons attached for closing the ankle strap.


Unfortunately, closing the ankle straps left a gap. If I had used rubber bands for the loops, this could have been prevented, but rubber deteriorates, so I used cotton yarn. I had to shorten the ankle straps a bit, because they were so stiff that I had to avoid any overlapping. I'm considering moving the buttons back a bit to close that gap, but for now, the shoes are finished.


Another view of the finished shoes.


Friday, August 13, 2010

Using rubber band as straps

I found thin rubber band in a craft supply shop and thought it might be good for doll shoes. As it's stretchy, you don't need buckles in straps.

I had a short piece of cardwoven band and I thought I wouldn't have any use for it as there was so little. However, there was enough for the vertical parts into which I glued the rubber band straps.


This photo shows how the straps were glued. First, I put glue to the underside of the vertical pieces, then placed the straps in place and let dry. When the glue was dry, I spread another layer of it on top of the straps to make sure they will stay in place. As this side won't show, it doesn't matter how it looks like.

Then I glued the ends of the straps under the insoles. I placed the insole against the doll's foot, placed the piece with straps in correct position on top of the foot and then glued the ends under the sole so that it was a tight fit, but without stretching the rubber bands.

Here is a picture of the finished shoes. The heels are made of balsa wood covered with leather.


Tuesday, August 10, 2010

Shoes with cork soles

For these shoes, I used the cork soles I made earlier.

I put so much effort in the soles that I thought the uppers needed to be something special as well. So I made the straps from sewing thread and thin metallic thread using colors I think fit well together with the color of cork. Here is the card weaving in progress (the pin is there to show the scale):


After the long piece from which I would cut the straps was finished, I measured the length of the necessary pieces, cut them and treated the ends with Fray Stop to keep them from unraveling.

The round pieces are buckles, which I cut from a length of decorative band I once bought just because it looked so nice. I didn't have any idea then what I would use it for, but it was perfect for this purpose.

Next, I glued the straps in place. This time I had to do this before finishing the buckle. The shorter part of the ankle strap was the right length at this stage, but the longer one had some extra length as it could only be adjusted after the straps were in place because of the buckle mechanism.


The next photo shows closeup of the buckle. It is sewn in place with the ends of the thread glued to the inside of the strap to keep them out of sight. The other part, attached to the shorter ankle strap, is just a piece of gold plated metal wire bent to 90 degree angle in the middle. The wire goes through the strap and the other half is glued to the inside of the strap. To close the buckle, you just put the "spike" into one of the holes in the buckle.


Finally, here is a picture of the finished shoes:


Friday, July 30, 2010

Sandals for a Monster High doll

This is the first pair of shoes I made for a Monster High doll. The insoles are made of leather and straps are cardwoven bands made of sewing thread and thin silver colored thread. To get the strap length correct, I decided to make the buckles first and only then glue the ankle straps in place. One thing to keep in mind while gluing the straps in place is to make sure you don't make them too tight. You need to be able to open and close the buckle. So make sure to check that you can do it before the glue has dried.


I used metal strips inside the soles to help keep the correct shape. It also helped dealing with the bulge caused by the end of the straps.


I thought it would be a good idea to add a little extra, so these wouldn't be just basic sandals. As the buckles aren't glued or soldered shut, the coins can be easily removed.


Almost ready: straps in place, outer soles glued in place, only heels are missing.


Here are the finished shoes. The heels are carved from balsa wood and covered with leather.


Tuesday, July 27, 2010

A finished pair of shoes for a Monster High doll

In addition to making the cork soles, I've also managed to get this pair finished. The inner and outer soles are made of leather, the heels are made of balsa wood and covered with leather, and the bands are cardwoven out of sewing thread.


Wednesday, February 17, 2010

Blue sandals for Miss Piggy

Here are pieces for another pair of sandals for Miss Piggy. The straps are cardwoven bands cut to suitable lengths and glued to a piece that goes around the bundle. The white pieces consist of a few layers of cardboard glued together in correct shape and they go in between the insole and outer sole. The beige pieces are insoles made of leather and glued to one layer of cardboard to keep the desired shape.


Next stage was gluing the straps in place and painting the edges of the in-between soles.


Longer straps were glued under the heel and these straps were to have buckles. As the cardwoven band is quite thick, I used small strips of leather to glue the buckles in place. A strip goes around the middle part of a buckle and the ends of the strip are glued in place so that the end of the strap is between them.


Here are the finished shoes. The outer soles are made of thick blue leather and the heels are made of wood and painted to match the color of the shoes.

Tuesday, February 9, 2010

Sandals for Miss Piggy

The straps on these shoes are made of narrow card woven band. I used cotton yarn for that, so it is a bit thick, but as Piggy isn't as realistic as fashion dolls, deviation from the correct scale doesn't matter.

I used modeling clay for the outer soles, because the straps were so thick that this was the best way to deal with them. This clay is the sort that dries on its own and doesn't need to be baked. The reason for using that kind of clay is that the other parts of the shoes probably wouldn't like the heat and the soles need to be in place while drying to keep the correct shape.

The clay soles won't stick to the inner soles as you can see. Still, it is important to have them in place while shaping and drying them, so you get the indentations for the straps in correct places.

When the clay soles are entirely dry, you just glue them in place (PVA glue works well) and maybe sand them a little, if the surface isn't smooth enough. In this picture, you can also see the purpose of those flowers in the back straps. They cover the ends of the straps which have been glued together.

Finally, I painted the clay parts and the sides of the inner soles and applied a coat of sealer. The heels are made of polymer clay and I mixed the color myself. It's a bit lighter than the soles, but close enough.


Sunday, April 19, 2009

Etsy

I put for sale into Etsy some things I have made earlier. There are also a couple of card woven bands made of sewing thread, which are suitable for miniature projects, and a couple of Barbie sized belts made of card woven band.

There will probably be more miniature card woven bands, because I'm experimenting with different colors and patterns. It's just so slow with thin sewing thread. On the other hand, a Barbie belt isn't very long, so it is easy to use the same colors for different patterns as there is no point setting everything up just for one short piece.


Original Finnish post is here.