Pages

Showing posts with label casting resin. Show all posts

Tuesday, January 28, 2014

New video tutorial

This video shows you how to cast foot lasts using the latex moulds made in the previous video.


And what happened to the rest of the resin? There was very little left, but fortunately, doll shoes can have really tiny soles. I picked two wedge sole moulds for the final castings.


As I only have one mould per design, I had to mix the resin in two batches. That wasn't easy, considering that this was all the hardener left:


And there wasn't much resin left in the bottle either.


This photo shows the tiny air bubbles you may get in the mixed resin. Letting the mixture be for a minute after mixing helps getting rid of these.


Here are the finished soles. The ones on the left are for Silkstone Barbies and the ones on the right for Pepper Parsons (a Pinkie Cooper doll).


I was curious to see how good I had been at measuring the components. The resin and hardener came in 250 ml bottles. At the time the hardener ran out, there was some resin left. About 7 ml isn't much when you consider the total amount.


Sunday, January 19, 2014

New foot lasts

Going through the stuff inspired me to do something else as well. I decided to use the rest of the casting resin before it goes bad. The latex is also getting a bit thick, so it's better to use it as well. So, I'm making some more foot lasts.

All this has been done before and posted in this blog, but here are some photos anyway. The first one shows Sybarite's feet with flower tape around the ankles and several layers of latex applied.


The next one is Tonner's Jessica Rabbit (17" athletic body). First with flower tape covering the ankle joints...


...and then with latex applied.


Here are the finished moulds for both.


And here are the resin castings made with the moulds. You can see the flower tape clearly, but it is much neater than saran wrap.


As you can see in this photo showing the earlier plaster castings of Sybarite's feet and the new resin castings.


Sunday, October 13, 2013

Making a master for a mould

I'm still making resin castings as 500 ml of resin is a lot for casting such small pieces. Finding out that latex moulds can be used with resin was really great, because I can make moulds for casting just one pair. You can't really use a special design, like the one for Monster High Nefera in the picture below, for a lot of shoes.


As you can see, the parts used for the master are really simple, just wooden and plastic beads, a round wooden stick (for keeping the heel parts together) and card stock. The main things are that the master lasts long enough to make the mould and that there are no openings between the parts for latex to get into (two coats of sealer will take care of that).

In the next picture, the master is attached to a base with clear mounting tape and two coats of sealer have been applied. This is for making the latex mould, which has been described in previous posts.


Here you can see the finished mould and the pair of castings. The part of the mould between the heel and sole needed to be cut a bit to remove the castings and turn the mould. Those parts of the sole were so close to each other that too much latex collected there when making the mould.


I also made a couple of pairs of soles for Miss Piggy. The masters for both designs were made of card stock (sole) and wood (heel). The Barbie wedge sole is included to show the scale.


With such a long and thin sole, it was necessary to have some extra support during the casting process. I removed the heel from the master and used the curved sole under the latex mould to ensure that the mould would keep the correct shape.


Friday, October 4, 2013

Replicas of MH Catty's boots

I got Monster High Catty Noir and seeing her boots got me thinking that I might be able to copy them. The boots consist of two halves, which should make it possible to make tubular latex moulds for them.


I attached the parts to small pieces of cardboard covered with packing tape. I used clear mounting tape to attach the pieces from the toe parts and them applied a few coats of latex. I had to make moulds for all four parts, because the two halves of one boot were different and the corresponding parts for the other boot were mirror images of those.


Here are two of the finished moulds. I was a bit worried that the holes wouldn't be big enough to get the pieces out of the moulds, but latex stretches quite a lot, so the moulds were usable.


Here you can see the size of the holes. The biggest problem with them came when pouring resin into the moulds as it would easily spill outside the mould.


Making the castings wasn't as straight forward as I had thought, because hanging the moulds vertically caused the moulds to deform as resin collected to the bottom. I had to fill the moulds half full first and place them almost horizontally so they would keep their form. Then when the resin had hardered a bit, I could pour in the rest and keep the moulds upright to keep the resin from spilling out.

Here you can see the original pair and the resin castings. The castings aren't quite successful as the seam in front won't close properly, but the result is still better than I expected. I'll just need to figure out a way to fix the front.


Tuesday, September 24, 2013

More resin casting

I have continued my experiments with latex moulds. I'm still having trouble with very small/thin parts, so when I decided to try Barbie-sized soles, I chose wedges. I had a cheap set of shoes for Steffi and picked a pair of those. In the photo, you can see an original shoe, one with straps removed, a resin casting, and the latex mould. Pouring resin into a mould this small is challenging, as is getting all air bubbles out, but it can be done.


Another part of my experiments is making foot lasts for all 1/6 scale dolls. In the photo below, the foot lasts from left to right belong to these dolls: Hollywood Royalty Lana Turner, Silkstone Barbie, Tiny Kitty Collier, Monster High Howleen, Bratzillaz, and Pinkie Cooper.


Friday, September 20, 2013

Using the high heel tubular mould

I thought the latex mould should be entirely dry already, so I made the first soles using it. My first idea for removing air bubbles from the heels worked just fine. I pressed the heel closed, poured in some resin, released the heel, and checked it. There was a small air bubble inside it, so I tilted the mould a bit and  squeezed the air out of the heel.


Then I released the heel again and this time it was full of resin, so I filled the rest of the mould.


The shape of the mould required building a support for it, so no resin would spill out.


And here is the finished casting. It is better to be able to make these with latex moulds as I only made two soles to get one pair of shoes. I don't make that many shoes for Rini, for whom these are intended, so it would be too expensive to use silicone for a mould for these.


Saturday, September 7, 2013

Resin casting with latex moulds

As I was reading the instructions of the casting materials I bought, it started to look like latex moulds could be used for resin casting. Of course I had to try it. For the experiment, I chose making castings of the Hollywood Royalty Lana Turner's feet. Plaster castings of that size are not very durable, so I thought it would be great to have them made of resin.

The earlier blog post about making foot lasts can be found here. This time I was using latex meant for making tubular moulds, so it worked a lot better.

When I made the latex moulds, I made small tabs on the back, so it would be easy to hang the moulds from the clips in my magnifying glass. Hanging them helps to keep the correct form while the resin hardens.


I treated the insides of the moulds with form releasing wax to protect the latex and to help remove the castings. I'm happy to say that the casting was successful and I now have resin foot lasts for Lana. There was an air bubble in her left big toe, so that's a small flaw, but it does not affect the usability of the lasts.


I also made some resin shoe soles using latex moulds. Unfortunately, the latex seems to deteriorate very quickly when used for resin casting. It can be used, but I didn't manage to make very many castings with one mould before holes started to appear. That could be due to not having just the right kind of form releasing agent. There are so many different varieties that it is hard to know, which one should be used. I used what I happened to have and it was the wax I bought for making and using silicone moulds.

I'm currently writing the chapters about mould making, casting, and doll feet, so this was part of the experiments I'm doing to figure out what needs to be included in the instructions. Doing it all as I'm writing also helps to remember things that have gone wrong and to find out new things that can go wrong, so I can include tips for avoiding those.

Sunday, September 1, 2013

Sandals for Tiny Kitty

Going through the resin soles I made on my first attempt at casting resin, I noticed some for Tiny Kitty and decided to make shoes using them. I started by making the insoles using card stock and leather. That way, I could continue with the uppers while waiting for the paint to dry.


I attached the resin soles to a support using double-sided mounting tape, so I could paint all sides except the top at once. I was using enamel paints and with them, the result is better, if you can paint all at once. I use mounting tape, because it is so thick that the sole does not touch the support.


Here are the soles after first coat of paint.


I wanted to use leather for the straps, but it is too thick to turn under the insoles when making shoes as small as these. So I cut the straps without any extra and made notches on the sides of the insoles for the ends of the straps.


Then I glued small strips of fabric at the ends of the straps.


And glued the straps into the notches, turning the fabric strips under the insoles. You could do this without the fabric, but the glued surface would be very small and I wouldn't trust it to hold. So the fabric is just for extra security.


I don't have pictures of the rest of the steps, but they are very simple. Just attach the straps for the toe parts the same way, glue the insoles in place and close the straps by attaching a bead to one side and making a hole to the other. You can see it below in the photos of the finished shoes.


I was planning to use some decorations on the straps, but I thought these looked so good like this that I discarded that plan. I can make another pair for that experiment.

Monday, August 19, 2013

Wedges for Sybarite

I realized I haven't used many of the cast resin soles I made for Sybarite a few years ago. I found interesting plastic material I wanted to use, so I decided to use a pair of cast resin wedge soles with that. I started by painting the soles black using enamel paint (solvent-based). The extra sole in front is there to show how the soles look straight out of the mould.


The plastic for the uppers looks like this. It was rectangular originally, but I had already cut the required pieces out at this point. These were available in various colors at 2 € per 10 x 12 cm piece. I got this and another piece in silver.


Here are the pieces for the shoes before trimming the edges.


And a closeup showing the structure of the material better.


Plus another closeup showing the back.


The insole is just one layer of card stock and a piece of leather. There was no reason to use more layers of card stock as the arch in the soles is exactly the same as in Sybarite's foot, so the foot provided the desired form during assembly. After trimming the edges of the plastic pieces, I attached them using sewing thread.


Here are the straps with sewing thread attached.


And here they are in place. As you can see, they stay straight at this stage because of the way the sewing threads are attached, but gluing the ends to the sides of the soles will correct that.


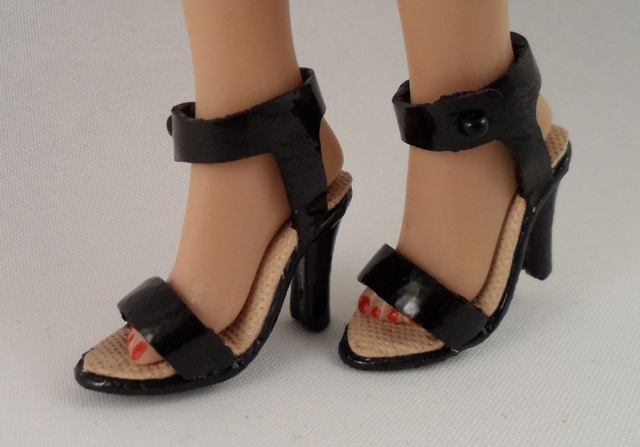
The ankle part is closed with a strap made of leather.


I attached a small piece of bent wire at the end of the strap and that goes through a hole on the opposite side as shown in the photo. It is the same method I used for Monster High shoes with cork soles and it works surprisingly well despite being so simple. You just need to apply a lot of glue on the inside of the strap where the end of the wire is to make sure the wire will stay in place and won't scratch the doll's foot.


All that is missing now are the wedge soles.


The strap looked a bit out of place as it was, so I decided to glue some leftover pieces to it.


Then it was time to glue the wedge soles in place and the ends of the toe straps to the sides of the soles, so the straps would keep their correct form.