


I used the molds for plaster casting and also experimented on using a latex mold to make polymer clay heels. I had never done that before, but thought it was worth trying.
|
|---|
Showing posts with label latex. Show all posts
Showing posts with label latex. Show all posts
Saturday, April 12, 2014
Saturday, April 5, 2014
Plaster casting with latex molds
The latest video is about making latex molds of heels for plaster casting.
Friday, January 24, 2014
First video tutorial
I just filmed the first video tutorial of the new series. It's about making latex moulds of a doll's feet.
The next video will be about using foot moulds to make castings.
The next video will be about using foot moulds to make castings.
Sunday, January 19, 2014
New foot lasts
Going through the stuff inspired me to do something else as well. I decided to use the rest of the casting resin before it goes bad. The latex is also getting a bit thick, so it's better to use it as well. So, I'm making some more foot lasts.
All this has been done before and posted in this blog, but here are some photos anyway. The first one shows Sybarite's feet with flower tape around the ankles and several layers of latex applied.

The next one is Tonner's Jessica Rabbit (17" athletic body). First with flower tape covering the ankle joints...

...and then with latex applied.

Here are the finished moulds for both.

And here are the resin castings made with the moulds. You can see the flower tape clearly, but it is much neater than saran wrap.

As you can see in this photo showing the earlier plaster castings of Sybarite's feet and the new resin castings.

All this has been done before and posted in this blog, but here are some photos anyway. The first one shows Sybarite's feet with flower tape around the ankles and several layers of latex applied.
The next one is Tonner's Jessica Rabbit (17" athletic body). First with flower tape covering the ankle joints...
...and then with latex applied.
Here are the finished moulds for both.
And here are the resin castings made with the moulds. You can see the flower tape clearly, but it is much neater than saran wrap.
As you can see in this photo showing the earlier plaster castings of Sybarite's feet and the new resin castings.
Friday, October 4, 2013
Replicas of MH Catty's boots
I got Monster High Catty Noir and seeing her boots got me thinking that I might be able to copy them. The boots consist of two halves, which should make it possible to make tubular latex moulds for them.

I attached the parts to small pieces of cardboard covered with packing tape. I used clear mounting tape to attach the pieces from the toe parts and them applied a few coats of latex. I had to make moulds for all four parts, because the two halves of one boot were different and the corresponding parts for the other boot were mirror images of those.

Here are two of the finished moulds. I was a bit worried that the holes wouldn't be big enough to get the pieces out of the moulds, but latex stretches quite a lot, so the moulds were usable.

Here you can see the size of the holes. The biggest problem with them came when pouring resin into the moulds as it would easily spill outside the mould.

Making the castings wasn't as straight forward as I had thought, because hanging the moulds vertically caused the moulds to deform as resin collected to the bottom. I had to fill the moulds half full first and place them almost horizontally so they would keep their form. Then when the resin had hardered a bit, I could pour in the rest and keep the moulds upright to keep the resin from spilling out.
Here you can see the original pair and the resin castings. The castings aren't quite successful as the seam in front won't close properly, but the result is still better than I expected. I'll just need to figure out a way to fix the front.

Tuesday, September 24, 2013
More resin casting
I have continued my experiments with latex moulds. I'm still having trouble with very small/thin parts, so when I decided to try Barbie-sized soles, I chose wedges. I had a cheap set of shoes for Steffi and picked a pair of those. In the photo, you can see an original shoe, one with straps removed, a resin casting, and the latex mould. Pouring resin into a mould this small is challenging, as is getting all air bubbles out, but it can be done.

Another part of my experiments is making foot lasts for all 1/6 scale dolls. In the photo below, the foot lasts from left to right belong to these dolls: Hollywood Royalty Lana Turner, Silkstone Barbie, Tiny Kitty Collier, Monster High Howleen, Bratzillaz, and Pinkie Cooper.


Another part of my experiments is making foot lasts for all 1/6 scale dolls. In the photo below, the foot lasts from left to right belong to these dolls: Hollywood Royalty Lana Turner, Silkstone Barbie, Tiny Kitty Collier, Monster High Howleen, Bratzillaz, and Pinkie Cooper.

Friday, September 20, 2013
Using the high heel tubular mould
I thought the latex mould should be entirely dry already, so I made the first soles using it. My first idea for removing air bubbles from the heels worked just fine. I pressed the heel closed, poured in some resin, released the heel, and checked it. There was a small air bubble inside it, so I tilted the mould a bit and squeezed the air out of the heel.

Then I released the heel again and this time it was full of resin, so I filled the rest of the mould.

The shape of the mould required building a support for it, so no resin would spill out.

And here is the finished casting. It is better to be able to make these with latex moulds as I only made two soles to get one pair of shoes. I don't make that many shoes for Rini, for whom these are intended, so it would be too expensive to use silicone for a mould for these.

Monday, September 16, 2013
Tubular mould for a high heel sole
Latex is so much cheaper than silicone that I'm now trying to make all possible moulds using latex. Looking at a master for a high heel sole, I got an idea I just had to try. I thought that it would be possible to make a tubular mould using latex by placing the opening under the toe part and attaching the master to a support only from that place. The picture below explains this better than any words. I used a square piece of mounting tape to attach the master to the cardboard structure.

Then I applied several layers of latex, letting it dry before applying the next layer.

Here you can see the size of the opening. It is fairly large, because the entire master needs to fit through it.

This is the trickiest part of removing the mould. You need to roll the mould over the highest part of the master, because too much stretching could tear the latex at this stage.

Here is the mould turned right side out. I'm going to let it set for a few days before casting, because removing the castings will require a lot of stretching and I want to be sure the mould can take it.

It'll be interesting to see how this will work. I got the master out of the mould, so removing the castings should not be a problem. Getting air bubbles out of the heel could be a challenge, but I already have a theory on how to do that. We'll see how it works once I get to use the mould.
Saturday, September 14, 2013
Casting resin: Feet with ankle joints
When I was ordering resin, I didn't realize that the bottles I got for my first try were 100 ml and the ones I ordered now were 250 ml. That's 0.5 liters of resin and it's a lot when making as small castings as doll shoe soles. So, I decided to make several castings of doll feet now that I found out I can use latex moulds. I've only got 500 g of silicone and that doesn't make many moulds, because you need so much of it around the master. 300 ml of latex, on the other hand, is enough for a bunch of moulds.
I wanted to find a better way of making castings of feet with ankle joints. The first time I tried it, I used saran wrap to protect the ankles and the resulting castings weren't very pretty, even though they were perfectly usable.

This time I was wondering if flower tape would do the job. It's stretchy and slightly adhesive, but not so much that it would leave glue stains to the doll's feet.

Monster High Deuce got to be the guinea pig for this experiment. I wrapped flower tape tightly around his ankles and then applied a few layers of latex.

The moulds weren't too hard to remove, even though flower tape has matte surface. You just need to make sure there are no open seams for the latex to go into and everything should work fine. Below are the finished moulds with some supports and ready for casting.

This is what the castings look like. Much neater than when using saran wrap. These are for making shoes with low heels, so that's the reason for the angle of the ankle.

Saturday, September 7, 2013
Resin casting with latex moulds
As I was reading the instructions of the casting materials I bought, it started to look like latex moulds could be used for resin casting. Of course I had to try it. For the experiment, I chose making castings of the Hollywood Royalty Lana Turner's feet. Plaster castings of that size are not very durable, so I thought it would be great to have them made of resin.
The earlier blog post about making foot lasts can be found here. This time I was using latex meant for making tubular moulds, so it worked a lot better.
When I made the latex moulds, I made small tabs on the back, so it would be easy to hang the moulds from the clips in my magnifying glass. Hanging them helps to keep the correct form while the resin hardens.

I treated the insides of the moulds with form releasing wax to protect the latex and to help remove the castings. I'm happy to say that the casting was successful and I now have resin foot lasts for Lana. There was an air bubble in her left big toe, so that's a small flaw, but it does not affect the usability of the lasts.

I also made some resin shoe soles using latex moulds. Unfortunately, the latex seems to deteriorate very quickly when used for resin casting. It can be used, but I didn't manage to make very many castings with one mould before holes started to appear. That could be due to not having just the right kind of form releasing agent. There are so many different varieties that it is hard to know, which one should be used. I used what I happened to have and it was the wax I bought for making and using silicone moulds.
I'm currently writing the chapters about mould making, casting, and doll feet, so this was part of the experiments I'm doing to figure out what needs to be included in the instructions. Doing it all as I'm writing also helps to remember things that have gone wrong and to find out new things that can go wrong, so I can include tips for avoiding those.
Wednesday, May 15, 2013
Unfinished projects
I've been doing some cleaning and there are a lot of unfinished projects, some of which may never be finished. I decided to collect some of them to this post.
First, a pair of Barbie stilettos, which were bright pink to start with. I painted them black using acrylic paint and then added sealer to prevent the paint from chipping. These are unfinished, because I haven't figured out what kind of straps to use and how to attach them.


Next, a pair of plaster castings for Monster High dolls. The first stage was making a master using balsa wood.

Here's the sanded and painted master with another one made of modeling clay.

Making the latex mould. If you want something else than a wedge sole with this technique, the easiest option is to make the back of the heel straight, so the opening can be placed there.

A pair of plaster soles right out of the mould.

Here after a few coats of paint. And that's how far this project has come.

Then another Monster High repaint. The next stage will be painting the round studs, but I've been postponing that, because I know how hard it will be with eyesight like mine.

The final one is an experiment with shrinking plastic. It's a thin sheet of plastic (white, opaque or transparent), which shrinks and hardens when you bake it in the oven. The first picture shows the piece I made to get the right measurements. The scale drawn in the piece of plastic was originally 3 cm long.

When you bake the pieces, they first curl and then straighten back. The result is flat, if the oven temperature is just right.

I used the plastic sheets to make the same kind of heels as in the shoes made entirely of cardboard. Far right is the pattern in the correct size, far left the pattern enlarged to take the shrinking into consideration, and in the middle is the baked plastic heel.

Here you can see the difference in thickness. The upper piece I'm holding is an unbaked sheet and the lower one is a baked piece.

I have also made the straight parts of soles for these and glued the heels into them, but that's where this project has stopped, at least for now. The next stage would be to make the inner soles, probably out of cardboard as usual.
Wednesday, February 9, 2011
Platforms for Monster High dolls
Yet another pair that has been unfinished for a long time. This is my first experiment for using plaster casting to make soles for Monster High doll shoes.
First I made the master in two parts using balsa wood. I carved the arch before gluing the parts together. Then I carved the final shape after gluing.

As balsa is very soft, it is best to carve a close approximate first, then continue by sanding, then apply several coats of acrylic paint, and finally finish the surface by sanding. As the surface of the casting will remain hidden under leather, fabric or whatever material you're going to use to cover the soles, the surface doesn't need to be very smooth. Just make sure there are no big bumps or holes.

Here the master is covered by latex used for making the mould. At this point, the latex is already dry and there is talcum powder to make sure the surfaces won't stick together as the mould and master are separated.

I made two moulds, so I could make a pair of soles at the same time. Here the plaster has been poured into the moulds, which are supported by some pieces of cork. As you can see, the mould on the right has too much plaster in it, but that doesn't matter as long as you remove the casting as soon as the plaster is hard enough to do so and carve the extra plaster away using a sharp hobby knife.

Here are the dry castings and pieces of leather to cover them. PVA glue works best for this purpose.

When using leather, you can spread glue also on the sides of the soles as it won't seep through. If you glue the sides, there is no need to glue flaps to the bottom of the soles, but you can just cut the excess leather and the cut edges will be covered by the leather piece glued to the bottom of the sole. The leftover pieces glued to the top of the soles here ensure that the insoles will stay even when glued in place.

If you use fabric, use glue only on the ends of the piece (it is best to place the seam to the inner side of the sole, to the place where the arch ends and flat part starts, as it won't be so noticeable there) and on the flaps to be glued on top and bottom of the sole.
Here are the finished shoes. The insoles consist of two layers of cardboard and the leather insoles. When gluing the straps in place, it is very important to make sure they are loose enough, so the shoes will go to the doll's feet. Unlike cardboard and leather construction, the plaster casting soles won't give in at all and the placement and length of straps needs to be considered carefully. The bottoms of the soles are covered with pieces of leather.

I'm not very happy with this first try as I realized that black leather isn't very good material for something like this. These should be much more extravagant, something colorful or glitzy would have been better. I've got another pair of plaster casting soles waiting, so I'll need to find something better for them.
Sunday, September 7, 2008
Sybarite's feet
Handling an entire doll is always a bit difficult and there is the risk that the doll will be stained by glue, paint or some other material used in making the shoes. That is why I usually make plaster castings of the doll's feet. I was a bit hesitant to do this with the Sybarite as she is made of different material than the vinyl dolls. Finally, I decided to try making a latex mould.
The latex I had used previously had become clumpy so I had to buy more of the stuff. Unfortunately, the new brand turned out to be almost unusable. The brand of latex shown below is not suitable for making tubular moulds. It is too thick and will rip easily under the sort of stress the mould is subjected to when removing it from the doll's leg.

As I could not get better latex right now, I decided to try this stuff anyway, although I had already found out how unsuitable for the purpose it was. I felt awful spreading the stuff on the feet of the doll that had been so expensive. It probably would have been a good idea to try the latex first on some part not usually visible, for example, the scalp.

I'm happy to tell that the doll suffered no ill effects from the latex. And I even managed to get the moulds out in one piece. That was probably because they were short and the hole was quite large.
Then followed casting the plaster. I used soles I had made for Sybarite to support the moulds. They helped to keep the moulds in correct position and also to keep the shape of the arch correct.

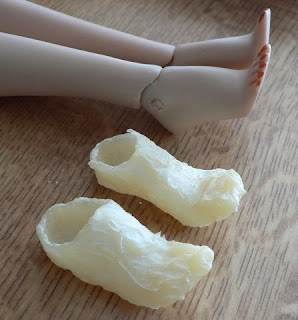
So now I have a pair of Sybarite feet. Their surface is not perfect due to the poor quality of the latex, but they are good enough for making shoes.

Original Finnish post
The latex I had used previously had become clumpy so I had to buy more of the stuff. Unfortunately, the new brand turned out to be almost unusable. The brand of latex shown below is not suitable for making tubular moulds. It is too thick and will rip easily under the sort of stress the mould is subjected to when removing it from the doll's leg.

As I could not get better latex right now, I decided to try this stuff anyway, although I had already found out how unsuitable for the purpose it was. I felt awful spreading the stuff on the feet of the doll that had been so expensive. It probably would have been a good idea to try the latex first on some part not usually visible, for example, the scalp.

I'm happy to tell that the doll suffered no ill effects from the latex. And I even managed to get the moulds out in one piece. That was probably because they were short and the hole was quite large.

Then followed casting the plaster. I used soles I had made for Sybarite to support the moulds. They helped to keep the moulds in correct position and also to keep the shape of the arch correct.

So now I have a pair of Sybarite feet. Their surface is not perfect due to the poor quality of the latex, but they are good enough for making shoes.

Original Finnish post
Subscribe to:
Posts (Atom)


