


The latest video is about making latex molds of heels for plaster casting.
|
|---|
Showing posts with label mold making. Show all posts
Showing posts with label mold making. Show all posts
Saturday, April 5, 2014
Wednesday, April 2, 2014
Flat soles using MoldMaker
In one the old videos, I made flat soles for the Baha Cat using polymer clay with a mold. This new video is about making flat soles using mold making clay and polymer clay. The doll for which I'm making the soles is again Baha Cat, although near the end, I'm also showing a mold for male Monster High dolls and some soles I made using it.
Sunday, March 30, 2014
Friday, March 28, 2014
Making a mold for heels using MoldMaker
The following video shows my attempt on making heels using a mold made of mold making clay and also an experiment on making a two-part mold with the clay.
By the way, the word "mould" or "mold" is really bugging me, because of the two ways of writing it. I have decided to stick with "mold" from now on as that is what I am using in the book and because the clay is called MoldMaker.
By the way, the word "mould" or "mold" is really bugging me, because of the two ways of writing it. I have decided to stick with "mold" from now on as that is what I am using in the book and because the clay is called MoldMaker.
Friday, January 24, 2014
First video tutorial
I just filmed the first video tutorial of the new series. It's about making latex moulds of a doll's feet.
The next video will be about using foot moulds to make castings.
The next video will be about using foot moulds to make castings.
Sunday, January 19, 2014
New foot lasts
Going through the stuff inspired me to do something else as well. I decided to use the rest of the casting resin before it goes bad. The latex is also getting a bit thick, so it's better to use it as well. So, I'm making some more foot lasts.
All this has been done before and posted in this blog, but here are some photos anyway. The first one shows Sybarite's feet with flower tape around the ankles and several layers of latex applied.

The next one is Tonner's Jessica Rabbit (17" athletic body). First with flower tape covering the ankle joints...

...and then with latex applied.

Here are the finished moulds for both.

And here are the resin castings made with the moulds. You can see the flower tape clearly, but it is much neater than saran wrap.

As you can see in this photo showing the earlier plaster castings of Sybarite's feet and the new resin castings.

All this has been done before and posted in this blog, but here are some photos anyway. The first one shows Sybarite's feet with flower tape around the ankles and several layers of latex applied.
The next one is Tonner's Jessica Rabbit (17" athletic body). First with flower tape covering the ankle joints...
...and then with latex applied.
Here are the finished moulds for both.
And here are the resin castings made with the moulds. You can see the flower tape clearly, but it is much neater than saran wrap.
As you can see in this photo showing the earlier plaster castings of Sybarite's feet and the new resin castings.
Sunday, October 13, 2013
Making a master for a mould
I'm still making resin castings as 500 ml of resin is a lot for casting such small pieces. Finding out that latex moulds can be used with resin was really great, because I can make moulds for casting just one pair. You can't really use a special design, like the one for Monster High Nefera in the picture below, for a lot of shoes.

As you can see, the parts used for the master are really simple, just wooden and plastic beads, a round wooden stick (for keeping the heel parts together) and card stock. The main things are that the master lasts long enough to make the mould and that there are no openings between the parts for latex to get into (two coats of sealer will take care of that).
In the next picture, the master is attached to a base with clear mounting tape and two coats of sealer have been applied. This is for making the latex mould, which has been described in previous posts.

Here you can see the finished mould and the pair of castings. The part of the mould between the heel and sole needed to be cut a bit to remove the castings and turn the mould. Those parts of the sole were so close to each other that too much latex collected there when making the mould.

I also made a couple of pairs of soles for Miss Piggy. The masters for both designs were made of card stock (sole) and wood (heel). The Barbie wedge sole is included to show the scale.

With such a long and thin sole, it was necessary to have some extra support during the casting process. I removed the heel from the master and used the curved sole under the latex mould to ensure that the mould would keep the correct shape.

Thursday, September 19, 2013
Fix for sticky silicone
On my first try of making silicone moulds, I got some problems with the hardener and parts of the mould remained sticky. This time, I tried to mix the hardener to the silicone more thoroughly, but still got some sticky parts. However, I found a fix for the problem. It occurred to me that as the hardener mixed in the silicone hardens it, hardener applied with a brush to the sticky surface should do the same. I tried it and it worked.
The uneven parts in the picture were the ones that remained sticky. They have a slightly different color, because the hardener is blue (to make it easier to see if it has been mixed in the silicone well enough).

Update on the book:
I have written most of the chapters about mould making and casting, plus quite a lot about materials. I currently have about 9,000 words written, plus 70 photos. There will be quite a lot of photos in the book, because it is so much easier to show things in pictures. It should also be easier for people with less than perfect command of English. The current plan is to have the book available only in English, although a Finnish version is also possible later, if I feel like translating the book and have time to do it.
The main change to the original plan is that I won't include any example projects. The book will be long enough with the other material. I'm thinking about a possibility of making another book later about example projects. First I need to get this one finished and see how much interest there is.
Monday, September 16, 2013
Tubular mould for a high heel sole
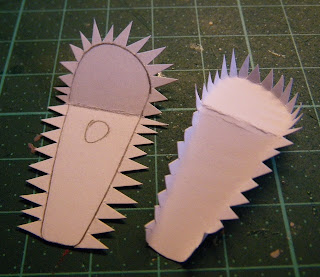
Latex is so much cheaper than silicone that I'm now trying to make all possible moulds using latex. Looking at a master for a high heel sole, I got an idea I just had to try. I thought that it would be possible to make a tubular mould using latex by placing the opening under the toe part and attaching the master to a support only from that place. The picture below explains this better than any words. I used a square piece of mounting tape to attach the master to the cardboard structure.

Then I applied several layers of latex, letting it dry before applying the next layer.

Here you can see the size of the opening. It is fairly large, because the entire master needs to fit through it.

This is the trickiest part of removing the mould. You need to roll the mould over the highest part of the master, because too much stretching could tear the latex at this stage.

Here is the mould turned right side out. I'm going to let it set for a few days before casting, because removing the castings will require a lot of stretching and I want to be sure the mould can take it.

It'll be interesting to see how this will work. I got the master out of the mould, so removing the castings should not be a problem. Getting air bubbles out of the heel could be a challenge, but I already have a theory on how to do that. We'll see how it works once I get to use the mould.
Wednesday, May 15, 2013
Unfinished projects
I've been doing some cleaning and there are a lot of unfinished projects, some of which may never be finished. I decided to collect some of them to this post.
First, a pair of Barbie stilettos, which were bright pink to start with. I painted them black using acrylic paint and then added sealer to prevent the paint from chipping. These are unfinished, because I haven't figured out what kind of straps to use and how to attach them.


Next, a pair of plaster castings for Monster High dolls. The first stage was making a master using balsa wood.

Here's the sanded and painted master with another one made of modeling clay.

Making the latex mould. If you want something else than a wedge sole with this technique, the easiest option is to make the back of the heel straight, so the opening can be placed there.

A pair of plaster soles right out of the mould.

Here after a few coats of paint. And that's how far this project has come.

Then another Monster High repaint. The next stage will be painting the round studs, but I've been postponing that, because I know how hard it will be with eyesight like mine.

The final one is an experiment with shrinking plastic. It's a thin sheet of plastic (white, opaque or transparent), which shrinks and hardens when you bake it in the oven. The first picture shows the piece I made to get the right measurements. The scale drawn in the piece of plastic was originally 3 cm long.

When you bake the pieces, they first curl and then straighten back. The result is flat, if the oven temperature is just right.

I used the plastic sheets to make the same kind of heels as in the shoes made entirely of cardboard. Far right is the pattern in the correct size, far left the pattern enlarged to take the shrinking into consideration, and in the middle is the baked plastic heel.

Here you can see the difference in thickness. The upper piece I'm holding is an unbaked sheet and the lower one is a baked piece.

I have also made the straight parts of soles for these and glued the heels into them, but that's where this project has stopped, at least for now. The next stage would be to make the inner soles, probably out of cardboard as usual.
Tuesday, September 11, 2012
Wedge soles using polymer clay
I decided to try, if the method I've been using for heels would also work with wedge soles. I have previously made this kind of soles using E-Z Water plastic that needs to be melted. With the plastic, I used a metal mold, but as polymer clay needs to be baked in the oven, I used cardboard for these.
I started by making a pattern. These soles are for Nefera, so I had to start from scratch.

Previously, I have made the back of the heel curved, but this time, I decided to try angles.

When using metal, the insoles are attached with adhesive tape, but as these molds will go into the oven, plastic isn't an option. So, I cut flaps all around the insoles, except at the back, where there needs to be a hole in the mold. The flaps need to be narrow, so the curves will come out nicely.
The next picture shows how to glue the insoles in place. This can be a bit messy with glue spreading all over your finger tips, but fortunately, only the inside of the mold needs to stay neat.

Then it was time to test that the arch of the foot is correct. The additional piece of cardboard on the side of the mold is there to fix a small hole (that particular angle is a bit tricky and if you're not careful, there will be a hole there). Note the hole on top, behind the doll's heel. That hole is there to help you see when the mold is full. When pressing the clay into the mold, only stop when it starts coming out of that hole. Remove any excess before baking the soles.

Here are the molds filled with polymer clay and ready for baking. At this stage, you should check that the bottom is even and that the soles do not lean left or right. Check also that the insole does not bulge. It is easier to fix that at this stage, but you can fix it also after baking, just use a craft knife and cut off any excess.

Finished heels after baking.

I started by making a pattern. These soles are for Nefera, so I had to start from scratch.

Previously, I have made the back of the heel curved, but this time, I decided to try angles.

When using metal, the insoles are attached with adhesive tape, but as these molds will go into the oven, plastic isn't an option. So, I cut flaps all around the insoles, except at the back, where there needs to be a hole in the mold. The flaps need to be narrow, so the curves will come out nicely.

The next picture shows how to glue the insoles in place. This can be a bit messy with glue spreading all over your finger tips, but fortunately, only the inside of the mold needs to stay neat.

Then it was time to test that the arch of the foot is correct. The additional piece of cardboard on the side of the mold is there to fix a small hole (that particular angle is a bit tricky and if you're not careful, there will be a hole there). Note the hole on top, behind the doll's heel. That hole is there to help you see when the mold is full. When pressing the clay into the mold, only stop when it starts coming out of that hole. Remove any excess before baking the soles.

Here are the molds filled with polymer clay and ready for baking. At this stage, you should check that the bottom is even and that the soles do not lean left or right. Check also that the insole does not bulge. It is easier to fix that at this stage, but you can fix it also after baking, just use a craft knife and cut off any excess.

Finished heels after baking.

Wednesday, September 5, 2012
Making modeling clay heels
My main problem with modeling clay is that I cannot make two identical pieces without a pattern or mold. So, I have solved the problem of making heels by using a cardboard mold.
This time I was making heels for 16" Miss Piggy's shoes. The photo below shows the cardboard insole with an empty mold for the heel.

The hardest part is making the pattern for the mold. You can see the basic form below, but it is very much trial and error. Once you've got the pattern right, draw the required number of them on cardboard, fold the front parts as shown, and cut out the pieces. You can make the folds after cutting, but I find this order easier.

Curve the back and sides of the heels using a suitable round object, for example, a marker pen.Then glue the front as shown. The result is the neatest, if the lower flap (the one that goes inside, against the modeling clay) covers the entire width of the heel front. If it doesn't, you'll get a visible seam in the modeling clay (see the last photo of this blog post).

When the glue is dry, pack the molds full of modeling clay. Press it tightly to avoid any gaps, but be careful, so you won't crush the mold. When the mold is full, use a craft knife to cut off any modeling clay that exceeds the top or bottom of the mold, and make sure the form of the heel is the way you want it.

Bake the heels in the oven according to the instructions given in the packaging of the modeling clay you're using. After getting them out of the oven, remove the cardboard immediately (as soon as you can handle the hot pieces). If you let the pieces cool down, the cardboard will be a lot harder to remove. If you're going to cover the heels with fabric, leather, etc., you can also leave the cardboard in place (especially, if you have used leftover pieces of clay of various colors and want to make sure that won't show through the material used for covering the heels).

Here are the finished heels for Miss Piggy.

The top of the heel may be convex even when you have cut it before baking. If that is the case, just use a craft knife to remove any extra material. This has the added benefit that glue will hold better, if the surface is cut or sanded after baking.

Monday, May 11, 2009
Mould making: Casting the doll shoe soles
What I forgot to mention in the last post is that I don't recommend the silicone I used for making these moulds. The red stuff I used earlier (see my home page) was much easier to work with and that was the first time I was making this kind of moulds. I think that silicone was manufactured by hobbytime, but I'm not quite sure.
I am sure that I will try to find better silicone for the next time, if there is going to be a next time. Rai-Ro web shop sells two component silicone, which sounds promising. That one is mixed 1:1 and that should make things a lot easier.
Let's move on to the main subject of this post, casting the soles. The picture below shows the casting resin I'm using. Those bottles had these childproof caps that you need to press and turn. Bad idea. The bottles were made of very soft plastic and it was impossible to get the caps open. I ended up cutting the bottles open and pouring the contents into two small airtight containers.

Before starting, I made two openings in the moulds, one to pour the resin in, another one to let the air out. After several unsuccessful attempts, I realized that for some reason, air wasn't getting out as planned. That's when I made the third opening at the bottom of the heel and cast the first complete sole. So, you need three openings as shown in the picture below.

Treat the forms with the form separating agent and let it dry before closing them for casting. I used small clamps to keep the halves of the mould together. Sturdy pieces of cardboard on both sides of the mould distribute the pressure evenly. The clamps should not be tightened too much, just enough to keep the mould halves together. If you tighten the clamps too much, the mould may get distorted.
Pour in a little resin through the opening in the toe part, turn the mould carefully back and forth to spread the resin and let the air bubbles out (tap the mould lightly to loosen any air bubbles), pour in more resin, turn again, and continue until the mould is full. You can see it is full, when the surface of the resin rises to the middle opening, which is in the highest part of the mould.
You probably won't have much time for all this as the resin starts hardening fairly quickly (check the instructions of the resin you're using). Mix small batches of resin and work with one or two moulds at a time.
Measuring the correct amount of resin is difficult with something this small. We're talking about milliliters here and there is always going to be a little extra mixture, no matter how carefully you measure. This is where a mould for a wedge sole becomes handy.
I made a mould for a wedge sole, because you can leave a large opening in a mould like that. When you have filled the mould you're working with and there's a bit of resin mixture left, instead of just letting it harden in the mixing bowl, pour it in the wedge sole mould. It may not fill the mould entirely, but as you cast several soles and pour the extra in the wedge sole mould, you're going to end up with a wedge sole eventually. The structure of the mould makes it easy to fill the mould a little bit at a time instead of filling it all at once. And even if the resin is already starting to get a bit thicker, it can still be poured into an open mould like this.
Here is a little video clip showing some of what I have explained above.
You should remove the cast sole from the mould as soon as it is solid. At this stage, it is still soft and it will be easy to cut off all extra resin. Remove the sole from the mould, cut off the protruding pieces where the openings were, wash the sole (to remove any remaining form separating agent), and cut off any extra resin, for example, in the seams. Then check that the shape of the sole is correct, for example, that the heel is straight, and let the piece harden as long as is needed to achieve final hardness.
The instructions of the casting resin said that it can't be stored very long after the bottles have been opened, so I decided to use it all at once. The picture below shows the cast soles that are good enough to use for shoes. Some of them have holes left by air bubbles, but those can be filled in and covered. Mostly these are for Sybarite's shoes. Most of the small soles are for Silkstone Barbie and Fashion Royalty shoes, but the ones on front left are for Tonner's Tiny Kitty Collier. The individual heels and toe parts on the right are for Tonner's American Model. The transparent yellow soles are made of E-Z Water plastic using the wedge sole moulds.

Earlier posts on the subject:
Mould Making: Making a master
Mould making: Silicone
Mould making: Problems with silicone
For the Finnish post, see here.
Sunday, May 10, 2009
Mould making: Problems with silicone
The first half of the mould did not harden as expected. I put a little too much hardener in the silicone and didn't have time to mix it properly, so some parts of that piece remain sticky even after a couple of days.
The surface is supposed to be firm and definitely not sticky like in the picture below (that's a closeup of my finger and the surface of the silicone that did not harden).

The problem with that batch was that it was so small, only 50 g. It is easier to measure the hardener for a larger amount of silicone, so I used 100 g for the next try and made several mould halves at once. This time everything went as it should.

I also decided to make one mould for a wedge sole. This one will have a very large opening and the reason for that will come out later as I explain the casting process.

The pink dots you can see on the surface of the silicone in the picture of the three mould halves are drops of the form separating agent. I don't know why it did not spread more evenly like it did when I used it for the models. Anyway, that was the next problem.
I managed to get the right amount of hardener in the next batch of silicone for the other halves of the moulds, so that went fine. When the silicone had hardened and it was time to separate the mould halves, things didn't go as expected. The halves were stuck together. I had to use a hobby knife to cut the moulds open. Fortunately, that worked fine and now I have moulds for the soles.

I have already cast a couple of soles with the moulds, but I will go into that in the next post as there are still things that need to be figured out.
For the Finnish post, see here.
Subscribe to:
Posts (Atom)


