


In one the old videos, I made flat soles for the Baha Cat using polymer clay with a mold. This new video is about making flat soles using mold making clay and polymer clay. The doll for which I'm making the soles is again Baha Cat, although near the end, I'm also showing a mold for male Monster High dolls and some soles I made using it.
|
|---|
Showing posts with label flat feet. Show all posts
Showing posts with label flat feet. Show all posts
Wednesday, April 2, 2014
Monday, February 18, 2013
Shoes for a Living Dead Doll
The Living Dead Dolls have flat feet, so quite a lot of faking is necessary to make something with even a small heel. Here are soles consisting of two layers of cardboard, leather insole, toe part made of air-drying clay (with a little piece of leather preventing the foot from touching the colored clay), and a thick layer of cork.

The toe part of the upper is the first to be glued in place. The clay part helps stretching the leather tightly to prevent creases.

Here you can see the idea. The thick part made of cork makes it possible to make heels for the shoes, and this sort of faking also helps in making shoes that are more in scale with the doll (the doll's feet are much too short compared to the doll's height).

The rest of the upper goes in place next.

This part isn't necessary as you could just glue the outer soles in place and make stacked heels, but I wanted to try something different. So, I took pieces of the leather I used for the uppers, cut outer soles that were slightly larger than what I would have used normally, and glued them in place.

Then I sewed stitches all around, giving the impression that the soles were stitched in place.

Here's a closer look of the stitches.
 After stitching, I trimmed the edges, glued the outer soles in place, trimmed those as well, and made stacked heels using the same leather as for the outer soles. Finally, I made the holes for laces and made laces using the same thread I used for stitching.

The shoes go on and off without opening the laces, so I put a little glue to the knots to prevent them from opening.


The toe part of the upper is the first to be glued in place. The clay part helps stretching the leather tightly to prevent creases.

Here you can see the idea. The thick part made of cork makes it possible to make heels for the shoes, and this sort of faking also helps in making shoes that are more in scale with the doll (the doll's feet are much too short compared to the doll's height).

The rest of the upper goes in place next.

This part isn't necessary as you could just glue the outer soles in place and make stacked heels, but I wanted to try something different. So, I took pieces of the leather I used for the uppers, cut outer soles that were slightly larger than what I would have used normally, and glued them in place.

Then I sewed stitches all around, giving the impression that the soles were stitched in place.

Here's a closer look of the stitches.


The shoes go on and off without opening the laces, so I put a little glue to the knots to prevent them from opening.

Saturday, February 26, 2011
Gladiator sandals
I've been wanting to make gladiator sandals for some doll and decided to make them for the skater doll. After all, this type of sandals are originally supposed to have flat soles.
The first photo shows the parts required: soles, zippers and straps. The straps are made of lace treated with sealer to keep its form. The insoles are pieces of leather with one layer of cardboard underneath. The white cardboard parts shown under the insoles did not make it to the final construction as it turned out that the soles need to be flexible or you can't get the shoes on the doll's feet.

Here you can see the zippers and straps glued in place.

And here is a back view. The problem with reqular sized zippers is that they don't open far enough. With high heel shoes, it is not a problem, but with flat feet, you need to be really careful with the length of the straps.

All that was left to do was gluing the leather outer soles in place. After this experiment, I'd say that buckles would be a better choice for this kind of shoes, although they would require more work both when making the shoes and when putting them on the doll's feet or taking off.

Saturday, February 19, 2011
Ballerina shoes
This is one of my newest dolls in her original outfit. Her feet turned out to be almost the same size as the tall blonde doll's, but I still decided to make new shoes for her.

I still have quite a bit of orange silk left and decided to try a pair with lining. After cutting the lining with the pattern I had made, I sewed the lining and upper together (the piece on the right in the photo) and then sewed the seam behind the heel and turned the piece over (the piece on the left in the photo).

The insoles have a piece of leather with one layer of cardboard underneath. I glued the uppers in place, gluing sometimes both layers at the same time, but in more difficult places, first the lining and then the silk.

Finally, I glued the leather outer soles in place. The problem with this construction is that you need to be very careful when sewing the back seam or you'll end up with uppers that are not identical, which is what happened here. The difference is not big, but I see it and it bugs me.

So, I made another pair, this time without lining. When the seam is glued, it is much easier to make the uppers identical. The edge of the fabric was treated with Fray Stay to prevent it from fraying.

Thursday, November 11, 2010
Leather shoes with buckles for the Baha Cat
I made leather shoes with buckles for the Baha Cat to go with the folk costume I'm making for the doll. The shoes I've seen in photos vary, but the common factor is black leather and gold colored buckles, so these should be close enough.
Here are the parts for the shoes. The insoles are made of one layer of cardboard covered with leather.

I started by attaching the toe part. As these shoes need to go over the wool socks I have knitted for the doll, the doll needed to have the socks on to make sure the shoes would be big enough.

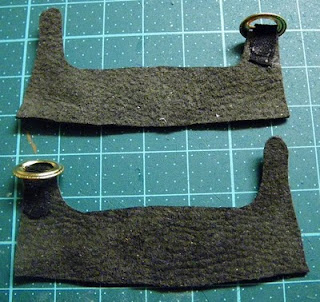
These parts form the back and sides of the shoes. I attached the buckle first, so I was able to check before gluing anything that I could get the opposite strap into it. To see how to glue these parts in place, see this earlier blog post.
Here are the finished shoes.

Here are the shoes on the doll's feet.

Here are the parts for the shoes. The insoles are made of one layer of cardboard covered with leather.

I started by attaching the toe part. As these shoes need to go over the wool socks I have knitted for the doll, the doll needed to have the socks on to make sure the shoes would be big enough.

These parts form the back and sides of the shoes. I attached the buckle first, so I was able to check before gluing anything that I could get the opposite strap into it. To see how to glue these parts in place, see this earlier blog post.

Here are the finished shoes.

Here are the shoes on the doll's feet.

Thursday, April 1, 2010
Shoe patterns on my web site
You can now find the patterns for Baha Cat boots and Schizo's shoes on my web site.
Sunday, March 7, 2010
Patent leather shoes
These shoes are for a Living Dead Doll and they are made basically the same way as loafers for Anges Dreary. There are a couple of differences, though.
First, these shoes have a pronounced heel, although the insole is quite flat. This is achieved by gluing several layers of cardboard in the other end, but leaving the heel with only one or two layers.

The material is patent leather, which is thick, so the only way to make fairly invisible seams was to sew them. In Agnes' shoes, the back seam is glued, but with this material that was not an option. I treated the inside of the leather with sealer, because the Living Dead Dolls seem to be much more prone to staining than other dolls, probably because of the matte surface of these dolls.

Here are the uppers with all seams sewn. When gluing the back seam, I do that only after gluing a few tabs of the upper under the insole, but with sewing, you need to finish the back seam before any gluing.

This is how the finished shoes look like. In Agnes' shoes, there were only two layers of leather for the heel and even that caused some balance issues. Here there are four layers of fairly thick leather glued together to form the heel and the doll stays in balance just fine, because inside the shoe, the sole is flat and level.

The doll's feet are sort of wedge-shaped and the extra layers of cardboard do not make the shoes look in any way odd. In fact, the shoes look more normal than ones with entirely flat soles would look, because this structure corrects the shape of the feet.
Tuesday, February 23, 2010
Red boots
These are soles for boots for a doll with flat feet. The soles are made of balsa wood, which is very easy to carve, and painted black on the sides, which will remain visible. You can paint them all black, but it isn't necessary.

Here are the upper parts for the boots. The edges of the fabric were treated with Fray Stop to keep them neat, although this fabric wasn't fraying much anyway (I guess that's because it seems to be in two layers, which are attached to each other probably with some sort of glue).

Here are the toe parts glued in place to cardboard and leather insoles.

The fabric felt a bit too thin for the eyelets, so I glued strips of leather on the reverse side for added strength before making the holes and attaching the eyelets.

Then it was just gluing these parts in place, gluing the balsa outer soles, and adding cotton yarn for laces.

Monday, February 15, 2010
Manolo Blahnik copy
As I was thinking of making copies of Manolo Blahnik shoes for a doll, I was thinking about high heels, but I ended up making something else instead.
The original shoe looks like this:

I used brown leather for the doll shoes as there was enough of it and I also had matching satin for the inside.
The pattern for the upper was easy to make by modifying a previous pattern.

After I had glued the upper in place, I glued satin to the inside parts that would remain visible and fixed them into the correct shape with adhesive tape while the glue hadn't dried yet.

When the glue was dry, I removed the tape and cut off extra fabric. The parts remained in the desired shape well enough.

Here are the finished shoes in plaster castings of the doll's feet.

For the Finnish post, see here.
Thursday, May 21, 2009
Making boots for a Pipos Baha Cat BJD, part II
Here is the second part of the video for making the Baha Cat boots.
The boots with the polymer clay outer soles glued in place.

With laces made of cotton yarn.

And last, but not least, Baha Cat in an outside photo shoot.


Earlier posts on the subject:
Mould making: Flat soles with Sculpey Mold Maker
Making a foot last for a doll with flat feet
Making boots for a Pipos Baha Cat BJD, part I
For the Finnish post, see here.
Monday, May 18, 2009
Making boots for a Pipos Baha Cat BJD, part I
I decided to make the red leather boots first. They are not finished yet, so this is just the first part. The picture below shows what is finished so far.

The video below shows the progress so far. The rest will be in part II.
Earlier posts on the subject:
Mould making: Flat soles with Sculpey Mold Maker
Making a foot last for a doll with flat feet
For the Finnish post, see here.

The video below shows the progress so far. The rest will be in part II.
Earlier posts on the subject:
Mould making: Flat soles with Sculpey Mold Maker
Making a foot last for a doll with flat feet
For the Finnish post, see here.
Sunday, May 17, 2009
Making a foot last for a doll with flat feet
I have usually made plaster castings of dolls' feet for making shoes for them, but BJDs are a bit difficult in that respect. They have open joints in ankles, so it is very hard to make a latex mould of their feet. I have done it with Sybarite, but I decided to try something else with the Pipos Baha Cat.
I carved a foot last out of balsa wood. It will be used for boots, so it doesn't matter if it is not exactly the right size as long as it is bigger than the doll's foot. After carving and sanding, I painted the last with acrylic paint.

As you can see, it is roughly the size and shape of the doll's foot. The exact shape depends on what kind of toe part the shoes are to have. I decided to make it round as that fits best the overall shape of the foot.

Afterwards, I thought that as I am going to use this for boots, maybe it would be better to have the ankle in it as well. So, I glued another piece of balsa wood on top of the last and carved the ankle part.

I will use this for making boots using the soles I made earlier out of polymer clay.
For the Finnish post, see here.
Monday, May 4, 2009
Mould making: Flat soles with Sculpey Mold Maker
I am going to make some moulds for doll shoe soles. There is some info on my home page, but I'll go into more detail here. Also, I know a lot more now than I did when I wrote those instructions.
I'll start with flat soles for Baha Cat's boots. The boots will be similar to the ones I have made earlier with cork soles for a lot bigger doll.
First I drew a pattern for the foot. Then I cut one piece of foam core and several layers of cardboard using the pattern.

I glued the cardboard pieces together, cut a heel out of that piece and glued it in place to the foamcore sole.

Then I drew a pattern for the sole in the rest of the multilayer piece, cut out the pieces and glued them to the foam core sole.

When the glue was dry, I painted the sole. I used gloss acrylic paint and applied several coats.

Now I had the model ready and it was time to make a mould. I used Sculpey Mold Maker, because that is what was available. There may be other clays similar to it.

See the instructions in the package for making the mould. I noticed that it is easier to make the mould, if you cool the clay in the fridge for some time (after shaping it to suitable size) before pressing the object into it.

Bake the clay in the oven according to the instructions in the package. When the mould is cool, mist it with water and press a piece of polymer clay into it. As you may guess from the amount of water, I didn't actually mist the mould, I just put it under the tap and then shook off the extra water. It works fine that way.
After making the desired amount of pieces, bake them in the oven. I used red clay to get better pictures. The actual soles are going to be black or brown, but I do have some red leather, so maybe the Baha Cat is going to get red boots as well.

This mould was easy to make. I'm also planning on making moulds for casting plastic soles for Sybarite's shoes, but more about that later.
Finnish post is here.
Subscribe to:
Posts (Atom)


