Pages

Thursday, September 27, 2012

barely there

Curvy Girl Chic Plus Size Fashion Blog Sheer Maxi Skirt Outfit
[:: Old Navy sweater (similar) :: H&M skirt (available in store; similar; similar) :: Topshop necklace (here) :: H&M cuff (similar) :: ]
[ :: H&M clutch (similar) :: Michael Kors heels (similarsimilar$$$ similar) :: ]
Curvy Girl Chic Plus Size Fashion Blog Sheer Maxi Skirt Outfit
[:: Old Navy sweater (similar) :: H&M skirt  (available in store; similarsimilar) :: Topshop necklace (here) :: H&M cuff (similar) :: ]
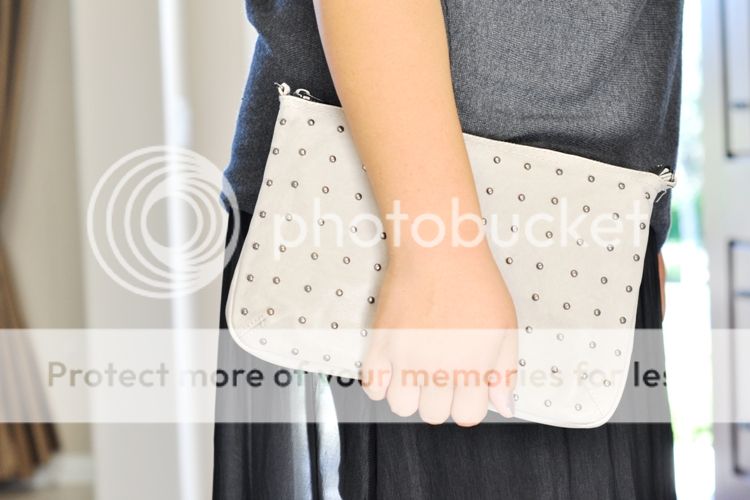
[ :: H&M clutch (similar) :: Michael Kors heels (similar, similar, $$$ similar) :: ]
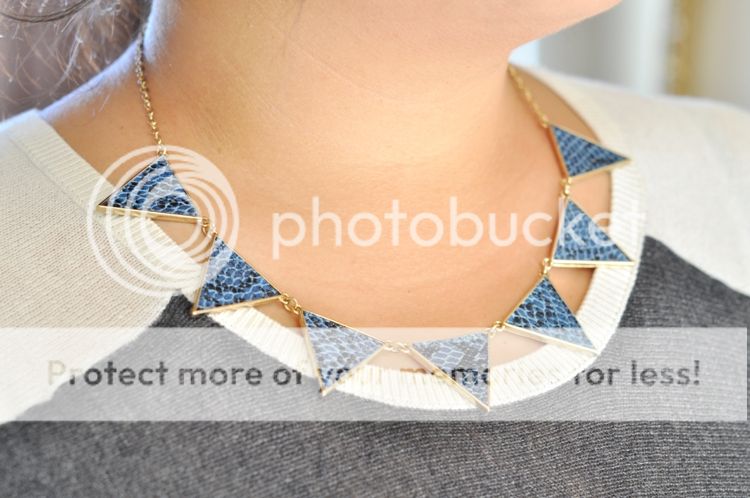
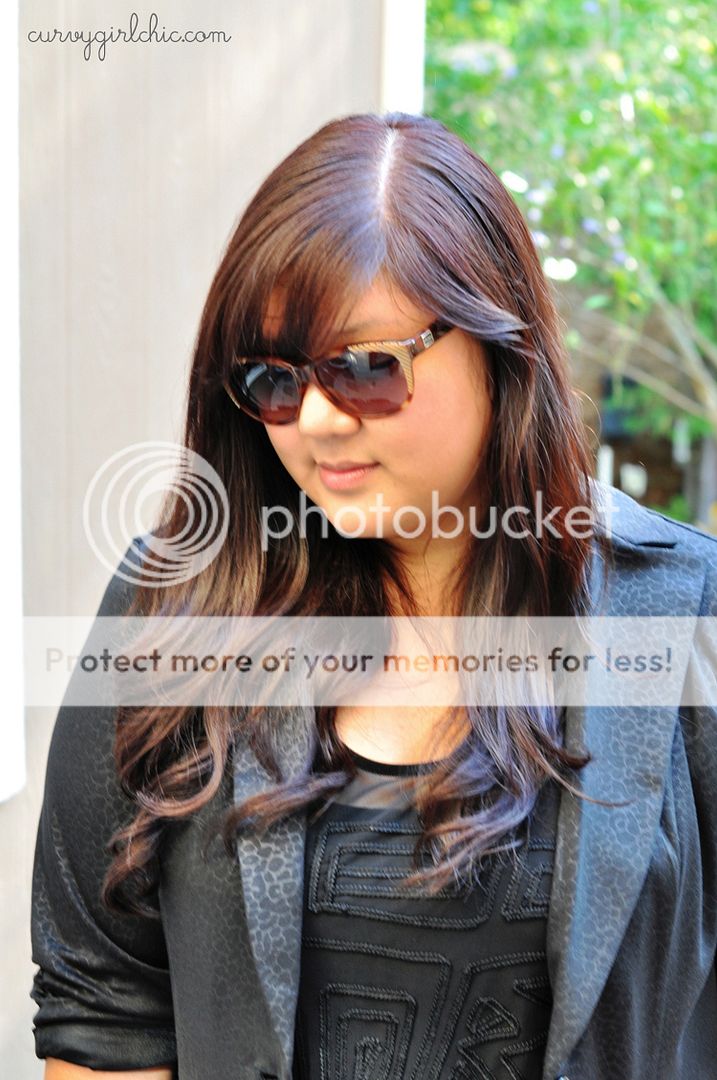
Scored this awesome maxi skirt on a recent trip to H&M! Love how sheer and floaty it is. Took the super high slits and sheerness down a notch by pairing it with a slouchy sweater better suited for grocery shopping than a night out but I kind of love it anyway.

Anyway, got back from New York last week--ahhh I want to move there! I so miss having four seasons and an H&M every other block. Super quick trip, and I'm bummed that I didn't get to catch up with my NY girls, but next time for sure!!

Tuesday, September 18, 2012

hello from nyc!


[ :: Torrid blazer c/o (here) :: H&M tank :: Torrid jeans (here) :: Simply Be boots (here) :: ]
[ :: H&M clutch (similar) :: Forever21 necklace (here, also awesome) :: Chloé sunglasses (here) :: ]


[ :: Torrid blazer c/o (here) :: H&M tank :: Torrid jeans (here) :: Simply Be boots (here) :: ]
[ :: H&M clutch (similar) :: Forever21 necklace (here, also awesome) :: Chloé sunglasses (here) :: ]

Hey guys! I'm in New York right now but I thought I'd share an outfit I wore during the ONE day it dropped below 75 degrees last week! You know, before it shot up to a blistering 99 degrees. >_<

I've been on a blazer kick recently (scroll down for evidence!), and this striped one from Torrid is probably the most comfortable one I've EVER owned! It's sweatshirt-y, and the whole thing is knit, so it's like wearing pajamas! It's the snuggie of the blazer family. But in a good way. With way more polish. Love!

Kept thing simple with skinny jeans and new riding boots from Simply Be. Also, how kick-ass is that spikey necklace?? It's all 3D and spikey and shiny. Good traits for a necklace to have.

Honestly, I just want it to be cold so I can start wearing things like my capes and boots, and scarves, sweaters, leather, tights, more blazers...can't help but feel like I'm in a fashion rut until it cools down! Anyone else in the same boat??

Edit: I got a few emails last week about whether I permed my hair or not, but all I did was curl my hair using a hair styler from ghd, which is probably the best flat iron I've used! It doesn't snag hair and preheats really quickly. Either way, it's an awesome styler, and is great for creating loose beachy waves that last for a long time! :) I definitely recommend it to anyone looking for a high quality styler. :)


Monday, September 17, 2012

Bratzillaz vs. Monster High feet

Bratzillaz dolls have actual feet, unlike Bratz dolls, and of course those feet are different size from any other doll. Monster High dolls come closest, but the arch in their feet is longer. Bratzillaz foot is also wider.

The photo shows from left to right: Bratzillaz, regular Monster High, Nefera.

Saturday, September 15, 2012

New patterns

Patterns for Monster High shoes and soles described in recent blog posts are now available on my web site.

Friday, September 14, 2012

More experiments with polymer clay

I was wondering if I could make something like the modified plastic castings in the previous post, but use polymer clay. I made a similar mold (only taller) using cardboard and cut pieces from the sides, so I could cut the clay after filling the mold.


Then I covered those openings with pieces of cardboard attached with adhesive tape. This helps in filling the mold.


When the mold was full, I removed those extra pieces.


Then I cut along the edges of the openings. That wasn't easy as the clay was a bit too soft even after a few hours in a fridge. Soft clay is easier when filling the mold, but makes cutting more difficult. The surfaces required some work after cutting to make them even.


Here are the soles after baking and removing the molds. I'm not quite happy with the shape, so I think these will have to be cut and sanded quite a bit. Still, I've got two soles of similar shape and size to work with, which is more than I could do without using molds.


Wednesday, September 12, 2012

Plastic castings

I decided to make soles for Monster High shoes using the plastic that is melted by heating (more details here). First I made simple wedge soles. I started by cutting the parts of the molds from thin copper sheet lined with packing tape.


Then I used pieces of the same tape to assemble the molds.


Here are the molds filled with hot plastic and waiting to cool down. The molds are attached to a piece of wood with double-sided tape to make sure they stay in correct position.


And here are the finished soles. This pale yellow is the original color of the E-Z Water plastic pellets.


Then I decided to experiment a bit and made molds for soles with separate heels for Nefera. I just modified the pattern I used for the polymer clay soles.


I was actually quite surprised to see that this worked. If it hadn't, I would have just returned the pieces to the melting pot for re-use. These soles are slightly darker than the previous ones, because I was running out of plastic and had to add a previously slightly overheated batch into the pot. Overheating makes the plastic get darker (and serious overheating makes it smoke and smell bad). The correct temperature to use is the lowest in which you can get the plastic to melt. My stove has a scale of 0 to 12 and setting 5 is just right for this.


Tuesday, September 11, 2012

stiletto x 2

Curvy Girl Chic Plus Size Fashion Blog Torrid Stiletto Skinny Jeans Review
[ :: Torrid blazer, stiletto ankle jeans, and heels c/o (here, here, and here) :: Forever 21+ top (here) :: ]
[ :: Kenneth Cole clutch (similar) :: Forever21 bracelets (here) :: Torrid ring c/o (here) :: Chloé sunglasses (here) :: ]
Curvy Girl Chic Plus Size Fashion Blog Torrid Stiletto Skinny Jeans Review

[ :: Torrid blazer, stiletto ankle jeans, and heels c/o (herehere, and here) :: Forever 21+ top (here) :: ]
[ :: Kenneth Cole clutch (similar) :: Forever21 bracelets (here) :: Torrid ring c/o (here) :: Chloé sunglasses (here) :: ]

That last photo is for the aunt who told me I should try posing differently 'cause I do the same thing in every post. THERE YA GO, AUNTIE. lol.

Came across these Torrid Stiletto skinny jeans on my quest for the perfect-for-fall wine colored jeans, and I LOVE them. The 28" ankle length is a little short for me at 5'7", but I absolutely love the color and the fit! I can't wait to try out their regular-length stiletto skinny jeans. Also, how ridiculous is this blazer? It makes me feel so...sassy? hahaha Love that it has a ruffled back and subtle leopard print!

Fall always makes me feel like busting out my tough-girl accessories, so studs, leather, and more studs start to take over my looks! Love the way the bright silver accessories pop on a darker look. Also, can you go wrong with grey snakeskin pumps? I think not.


P.S. If you follow me on twitter, you may have seen me tweet about Forever21 now carrying sized bangles. Totally awesome! The ones in this post go on super easy, and I have huge hands. Just a little PSA! :D

Wedge soles using polymer clay

I decided to try, if the method I've been using for heels would also work with wedge soles. I have previously made this kind of soles using E-Z Water plastic that needs to be melted. With the plastic, I used a metal mold, but as polymer clay needs to be baked in the oven, I used cardboard for these.

I started by making a pattern. These soles are for Nefera, so I had to start from scratch.


Previously, I have made the back of the heel curved, but this time, I decided to try angles.


When using metal, the insoles are attached with adhesive tape, but as these molds will go into the oven, plastic isn't an option. So, I cut flaps all around the insoles, except at the back, where there needs to be a hole in the mold. The flaps need to be narrow, so the curves will come out nicely.


The next picture shows how to glue the insoles in place. This can be a bit messy with glue spreading all over your finger tips, but fortunately, only the inside of the mold needs to stay neat.


Then it was time to test that the arch of the foot is correct. The additional piece of cardboard on the side of the mold is there to fix a small hole (that particular angle is a bit tricky and if you're not careful, there will be a hole there). Note the hole on top, behind the doll's heel. That hole is there to help you see when the mold is full. When pressing the clay into the mold, only stop when it starts coming out of that hole. Remove any excess before baking the soles.


Here are the molds filled with polymer clay and ready for baking. At this stage, you should check that the bottom is even and that the soles do not lean left or right. Check also that the insole does not bulge. It is easier to fix that at this stage, but you can fix it also after baking, just use a craft knife and cut off any excess.


Finished heels after baking.


Thursday, September 6, 2012

More plastic

I decided to try the transparent plastic in Piggy's shoes. As usual, first I needed the insoles.


I glued fabric on them.


And turned the edges under the soles.


I'm usually not particular about the placement of patterns in insoles, but this time I made sure the they would be identical.


Then I cut wide straps from plastic, added strips of stickers, and applied glossy sealer to stop the stickers from falling off.


I made holes at the end of the straps as before and used double-sided tape to keep the straps in place before gluing.


I used one pair of the polymer clay heels just made. I applied one coat of glossy sealer, let it dry, added stickers, and then applied more sealer. The purpose of the first coat of sealer was to make the surface less porous and help the stickers stay in place.


I actually applied the last coat of sealer after assembling the shoes and hung the shoes to dry. The result is always neater, if you can apply the sealer to all necessary surfaces (sides, back, front, bottom) at once, but that means you need to figure out a way to place the heels/shoes to dry in a way that the wet surfaces won't touch anything.


Here are the shoes on 16" Miss Piggy.


For the previous post on using transparent plastic, see here.