Pages

Wednesday, September 25, 2013

TRANSITION DRESSING

Curvy Girl Chic Plus Size Fashion Blog Simply Be ASOS Outfit- Transition Dressing

Incorporating leather into my outfits in a way that won't leave me with a heat stroke has more or less become my mission in life. It may be 90 degrees but that won't keep me from wearing leather on a daily basis!

[ :: Luxe Bead Trim Blouse c/o Simply Be :: ASOS navy leather skirt (ASOS Curve version here) :: ]
[ :: Alexander Wang Rocco in Iodine (in black here) :: Forever 21 bracelets :: Michael Kors heels (similar) :: ]

Paired with an embellished sleeveless blouse from Simply Be's Luxe collection, this skirt feels totally weather-appropriate. I can't wait until it cools down enough to pair these with a classic trench like this one or this sleek tuxedo blazer. This shirt would be way cute with skinny jeans and riding boots, too! :)

Curvy Girl Chic Plus Size Fashion Blog Simply Be ASOS Outfit
Curvy Girl Chic Plus Size Fashion Blog Simply Be Luxe Collection Bead Trim Blouse
Curvy Girl Chic Plus Size Fashion Blog Asos Leather Skirt and Michael Kors Heels

❤❤ As always, thanks for reading! ❤❤

Tuesday, September 24, 2013

More resin casting

I have continued my experiments with latex moulds. I'm still having trouble with very small/thin parts, so when I decided to try Barbie-sized soles, I chose wedges. I had a cheap set of shoes for Steffi and picked a pair of those. In the photo, you can see an original shoe, one with straps removed, a resin casting, and the latex mould. Pouring resin into a mould this small is challenging, as is getting all air bubbles out, but it can be done.


Another part of my experiments is making foot lasts for all 1/6 scale dolls. In the photo below, the foot lasts from left to right belong to these dolls: Hollywood Royalty Lana Turner, Silkstone Barbie, Tiny Kitty Collier, Monster High Howleen, Bratzillaz, and Pinkie Cooper.


Friday, September 20, 2013

Using the high heel tubular mould

I thought the latex mould should be entirely dry already, so I made the first soles using it. My first idea for removing air bubbles from the heels worked just fine. I pressed the heel closed, poured in some resin, released the heel, and checked it. There was a small air bubble inside it, so I tilted the mould a bit and  squeezed the air out of the heel.


Then I released the heel again and this time it was full of resin, so I filled the rest of the mould.


The shape of the mould required building a support for it, so no resin would spill out.


And here is the finished casting. It is better to be able to make these with latex moulds as I only made two soles to get one pair of shoes. I don't make that many shoes for Rini, for whom these are intended, so it would be too expensive to use silicone for a mould for these.


Thursday, September 19, 2013

Shoes that fit Pinkie Cooper dolls

I just got Pepper Parson of the Pinkie Cooper range and of course I had to check, if any of the existing shoes would fit her. Unfortunately, it looks like only boots will fit, because the doll's feet don't need to go all the way into them.

Here is the doll wearing Barbie boots from 1970's.


A closeup from the side shows that the boots aren't a perfect match, but they look like this on most other dolls as well.


Another pair of boots that fit are these white cowboy boots I have originally bought for Blythe.


However, the best fit comes from a Re-Ment set. These look very nice and just the right size.


No other Barbie shoes than the brown boots fit the doll, but these Barbie leg warmers look quite nice on her. I might try making something of ballet shoe type to go with these.


Fix for sticky silicone

On my first try of making silicone moulds, I got some problems with the hardener and parts of the mould remained sticky. This time, I tried to mix the hardener to the silicone more thoroughly, but still got some sticky parts. However, I found a fix for the problem. It occurred to me that as the hardener mixed in the silicone hardens it, hardener applied with a brush to the sticky surface should do the same. I tried it and it worked.

The uneven parts in the picture were the ones that remained sticky. They have a slightly different color, because the hardener is blue (to make it easier to see if it has been mixed in the silicone well enough).


Update on the book:

I have written most of the chapters about mould making and casting, plus quite a lot about materials. I currently have about 9,000 words written, plus 70 photos. There will be quite a lot of photos in the book, because it is so much easier to show things in pictures. It should also be easier for people with less than perfect command of English. The current plan is to have the book available only in English, although a Finnish version is also possible later, if I feel like translating the book and have time to do it.

The main change to the original plan is that I won't include any example projects. The book will be long enough with the other material. I'm thinking about a possibility of making another book later about example projects. First I need to get this one finished and see how much interest there is.

Tuesday, September 17, 2013

FALL FORWARD

Curvy Girl Chic Plus Size Outfit Blog Fall Forward with Simply Be USA
You guys. This Sunday will be the first. day. of. fall. I can't wait to break out things with sleeves and knits and jeans and leather and jackets and cinnamon flavored/scented everything!

[ :: sequinned tunic (worn as dress :P) c/o Simply Be :: snakeskin heels (here) :: ]
[ :: Coach clutch (in solids here) :: Forever 21 bracelet (here) :: ]

Ushering in a new season also means ushering in new clothes, and this dress is a new favorite from Simply Be's Luxe Collection. I love the densely packed sequins, and the fact that they're matte makes this perfect for so many occasions. Since the piece is such a statement maker, I kept the accessories simple with a leopard clutch and classic pumps. I have a thing about wearing tunics as dresses, but for those of you looking for a little more coverage, this would look fab paired with dark jeans and boots, or even some leather skinny pants and heels!

Curvy Girl Chic Plus Size Outfit Blog Fall Forward with Simply Be USA Luxe
Curvy Girl Chic Plus Size Outfit Blog Fall Forward Simply Be Luxe Sequinned Tunic
Curvy Girl Chic Plus Size Outfit Blog Fall Forward Coach Clutch
Curvy Girl Chic Plus Size Outfit Blog Fall Forward INC Lilly Heels

As always, thanks for reading! ❤
FACEBOOK | TWITTER | INSTAGRAM | BLOGLOVIN

Monday, September 16, 2013

Tubular mould for a high heel sole

Latex is so much cheaper than silicone that I'm now trying to make all possible moulds using latex. Looking at a master for a high heel sole, I got an idea I just had to try. I thought that it would be possible to make a tubular mould using latex by placing the opening under the toe part and attaching the master to a support only from that place. The picture below explains this better than any words. I used a square piece of mounting tape to attach the master to the cardboard structure.


Then I applied several layers of latex, letting it dry before applying the next layer.


Here you can see the size of the opening. It is fairly large, because the entire master needs to fit through it.


This is the trickiest part of removing the mould. You need to roll the mould over the highest part of the master, because too much stretching could tear the latex at this stage.


Here is the mould turned right side out. I'm going to let it set for a few days before casting, because removing the castings will require a lot of stretching and I want to be sure the mould can take it.


It'll be interesting to see how this will work. I got the master out of the mould, so removing the castings should not be a problem. Getting air bubbles out of the heel could be a challenge, but I already have a theory on how to do that. We'll see how it works once I get to use the mould.

Saturday, September 14, 2013

Casting resin: Feet with ankle joints

When I was ordering resin, I didn't realize that the bottles I got for my first try were 100 ml and the ones I ordered now were 250 ml. That's 0.5 liters of resin and it's a lot when making as small castings as doll shoe soles. So, I decided to make several castings of doll feet now that I found out I can use latex moulds. I've only got 500 g of silicone and that doesn't make many moulds, because you need so much of it around the master. 300 ml of latex, on the other hand, is enough for a bunch of moulds.

I wanted to find a better way of making castings of feet with ankle joints. The first time I tried it, I used saran wrap to protect the ankles and the resulting castings weren't very pretty, even though they were perfectly usable.


This time I was wondering if flower tape would do the job. It's stretchy and slightly adhesive, but not so much that it would leave glue stains to the doll's feet.


Monster High Deuce got to be the guinea pig for this experiment. I wrapped flower tape tightly around his ankles and then applied a few layers of latex.


The moulds weren't too hard to remove, even though flower tape has matte surface. You just need to make sure there are no open seams for the latex to go into and everything should work fine. Below are the finished moulds with some supports and ready for casting.


This is what the castings look like. Much neater than when using saran wrap. These are for making shoes with low heels, so that's the reason for the angle of the ankle.


Comparison: Howleen and Tiny Kitty

As I was making resin castings of Monster High Howleen's feet, I started to think that they looked remarkably like Tiny Kitty's feet. So of course I had to check. The first photo shows Howleen on the left and Tiny Kitty on the right. The arches of their feet seemed very similar.


Here are the feet shown with a sole I have made for Tiny Kitty. As you can see, the arch fits Howleen very well and even the length of the feet is the same.


The problem arises when you look at the toes. Howleen's foot is much wider, so shoes made for Tiny Kitty won't fit her. However, I am wondering whether it would be a good idea to make shoes using Howleen's feet, so they would fit both dolls. Some shoes could be too loose for Tiny Kitty, but some models might work. I guess I'll just have to try and see.


Tuesday, September 10, 2013

UNEXPECTED HUES: 9 Awesome Leather Pieces I'm Coveting for Fall

Hey guys! I'm back from a whirlwind trip in NYC, and while the runways are being walked by models in S/S 2014 gear, I'm itching to share some of my favorite pieces for fall! This summer feels like it has lasted a lifetime. I'm so ready for it to cool down so I can bust out my coats, jeans, sweaters and boots!

Every fall, I find myself obsessing over all things leather, and this year is no different! While black and brown pieces are always classic, this year, I'm gravitating toward more unexpected colors--burgundy, various shades of blue, and dark, smoky greens. Click through the slideshow below for a few of my favorite leather pieces in unconventional shades!

I can't get enough! The leather t-shirt and navy skater skirt are my absolute must haves. What about you? Is colored leather striking your fancy for fall? :)
FACEBOOK | TWITTER | INSTAGRAM | BLOGLOVIN

Saturday, September 7, 2013

Resin casting with latex moulds

As I was reading the instructions of the casting materials I bought, it started to look like latex moulds could be used for resin casting. Of course I had to try it. For the experiment, I chose making castings of the Hollywood Royalty Lana Turner's feet. Plaster castings of that size are not very durable, so I thought it would be great to have them made of resin.

The earlier blog post about making foot lasts can be found here. This time I was using latex meant for making tubular moulds, so it worked a lot better.

When I made the latex moulds, I made small tabs on the back, so it would be easy to hang the moulds from the clips in my magnifying glass. Hanging them helps to keep the correct form while the resin hardens.


I treated the insides of the moulds with form releasing wax to protect the latex and to help remove the castings. I'm happy to say that the casting was successful and I now have resin foot lasts for Lana. There was an air bubble in her left big toe, so that's a small flaw, but it does not affect the usability of the lasts.


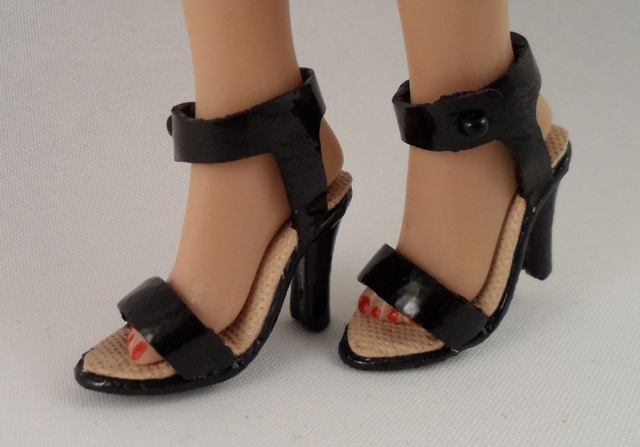
I also made some resin shoe soles using latex moulds. Unfortunately, the latex seems to deteriorate very quickly when used for resin casting. It can be used, but I didn't manage to make very many castings with one mould before holes started to appear. That could be due to not having just the right kind of form releasing agent. There are so many different varieties that it is hard to know, which one should be used. I used what I happened to have and it was the wax I bought for making and using silicone moulds.

I'm currently writing the chapters about mould making, casting, and doll feet, so this was part of the experiments I'm doing to figure out what needs to be included in the instructions. Doing it all as I'm writing also helps to remember things that have gone wrong and to find out new things that can go wrong, so I can include tips for avoiding those.

Sunday, September 1, 2013

Sandals for Tiny Kitty

Going through the resin soles I made on my first attempt at casting resin, I noticed some for Tiny Kitty and decided to make shoes using them. I started by making the insoles using card stock and leather. That way, I could continue with the uppers while waiting for the paint to dry.


I attached the resin soles to a support using double-sided mounting tape, so I could paint all sides except the top at once. I was using enamel paints and with them, the result is better, if you can paint all at once. I use mounting tape, because it is so thick that the sole does not touch the support.


Here are the soles after first coat of paint.


I wanted to use leather for the straps, but it is too thick to turn under the insoles when making shoes as small as these. So I cut the straps without any extra and made notches on the sides of the insoles for the ends of the straps.


Then I glued small strips of fabric at the ends of the straps.


And glued the straps into the notches, turning the fabric strips under the insoles. You could do this without the fabric, but the glued surface would be very small and I wouldn't trust it to hold. So the fabric is just for extra security.


I don't have pictures of the rest of the steps, but they are very simple. Just attach the straps for the toe parts the same way, glue the insoles in place and close the straps by attaching a bead to one side and making a hole to the other. You can see it below in the photos of the finished shoes.


I was planning to use some decorations on the straps, but I thought these looked so good like this that I discarded that plan. I can make another pair for that experiment.